1. Getting Started
1.1. Downloading and Installing
Download ActiLife 6 from http://www.theactigraph.com/actilife to a known location. Double-click the icon to start the installer. After running the ActiLife6 installer, follow the installation instructions in the on-screen prompts.

ActiLife 6 Setup Icon
Note
Please be sure to remove any ActiGraph devices that you have connected to your computer during installation. Failure to do so could result in a faulty installation of your ActiLife software.
Note
Older versions of ActiLife (4 and 5) will be removed whenever ActiLife 6 is installed
After installing ActiLife, an icon similar to the one shown here will appear on your desktop. Double click the icon to start ActiLife 6.

ActiLife 6 Desktop Shortcut
1.2. Licensing
ActiLife software is a licensed program and requires users to obtain a product key before the software can be activated. If you have not purchased an ActiLife license, you may do so by visiting the ActiGraph store at http://www.theactigraph.com/store . If you have misplaced your product key, contact ActiGraph sales support at support@theactigraph.com in order to proceed. Once ActiLife 6 has been purchased or upgraded from a previous version, users are entitled to free updates for 12 months. After that period, an optional maintenance plan may be purchased. It is highly recommended that users purchase the maintenance plan in order to guarantee access to the newest updates, features, and bug fixes.
1.3. Activation Over the Internet
The first time the program is launched, users will be presented with a screen similar to that shown in Figure 3. If you have already received a product key for your ActiLife Pro or ActiLife Lite software, type that product key in the box provided. If the license formatting is correct, a green check mark will appear to the right of the license box. Click “Activate”. ActiLife will connect to ActiGraph’s license server to confirm that the product key is correct and that it has indeed been purchased or upgraded. After activation, a screen similar to the one shown in Figure 4 will be displayed. This screen summarizes the product type and the number of activations used and available, as well as the name and contact information of the person to whom the license is registered. Name, Email, and Organization fields must be populated in order to continue. This activation process is required for each computer on which ActiLife is running.

ActiLife Activation Screen

ActiLife Registration Confirmation
1.4. Activation Without an Internet Connection
For users without an internet connection, ActiLife can be activated by contacting our technical support staff either via email (support@theactigraph.com) or by phone (1-877-497-6996 option 1). Similar to the Internet activation, enter the ActiLife product key in the first box that appears after launching the program. After clicking “Continue,” a screen similar to Figure 5 will appear. Provide the 24-character product key to ActiGraph customer service representative. After validating the product key, the representative will provide a confirmation code. Type or copy/paste the confirmation code into the box provided. Click ‘Next’ to activate ActiLife.
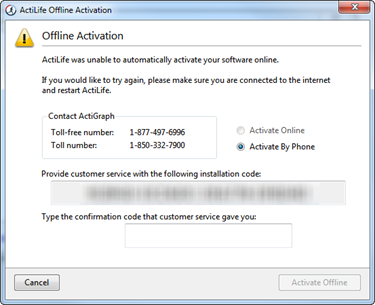
Non-Internet Activation
1.5. ActiLife New Feature Overview
Each release (update) of ActiLife provides users with a new feature overview. This screen (or similar) will appear immediately after loading ActiLife 6 for the first time. Note that this screen will change with each release to quickly illustrate the new features.

ActiLife Welcome Screen
To view this welcome screen again at any time, select the ‘Help’ tab in the menu bar and then select ‘ActiLife Tour’ as shown in Figure 7.
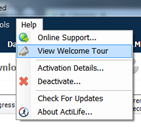
Run Tour From Help Menu
1.6. ActiLife Data Formats
ActiLife stores and uses data from native *.agd files which are produced during the download or export process for all devices. These files are in SQLite Format, which is essentially a small database. ActiLife can import data from any legacy file formats by selecting “File->Import/Export” and selecting the appropriate action from the menu (see the ActiLife Main Menu discussion section in this manual). Multiple files can be imported simultaneously.